Friday, November 12, 2010

Filling the Square Foot Garden

So I was going to write about how I prepared my vegetable garden a while ago, but I have been too busy in my garden to actually get around to blogging about it! So I actually did this back in August, and it is working very well, but I'll update with new garden photos later. First off I want to explain about the mixture I used for the boxes. As I am using something called the 'Square Foot Method' I wanted to be fairly true to the book and follow the instructions to create a good growing medium. This involves using a formula of 1/3 blended compost, 1/3 vermiculite (a type of volcanic rock) and 1/3 peat moss. I was a bit sceptical about using peat moss as I remember the devastation of peat bogs in the UK, but peat moss in NZ is from sustainable places apparently so I felt a bit better about it. The vermiculite was difficult to source, but I eventually got it from a gardening supply place in Christchurch who happily couriered it down to me. For the compost, the book recommends using at least 5 different types, but this was pretty difficult, especially as many bagged composts don't actually state what is in them. I used Tui vege mix, Nicholls organic, Tui organic and worm castings. My boxes are 12" deep but I only needed to use the mix for the top 6" so the bottom half I just used plain compost of a different type again underneath.

My equipment - tarp, buckets, and compost, as well as the trusty book.


First I mixed up all the compost (I had already done lots of sums to work out how much of each compost I would need).

Then the peat and vermiculite were added and the whole thing was dampened and mixed some more.


Then I dragged the tarp over to my boxes and started shovelling it in with the bucket, wetting the mixture frequently which helps the compressed peat moss to expand.

I actually mixed it up for each box one by one, so did the whole thing 4 times. It got a lot easier...

All four boxes are filled up, and I had some left over as I have a box which is only half the size of the others - saved it for my next box. My flatmate and her entire extended family turned up while I was doing this... I'm pretty sure they thought I was completely crazy...

Then it was time to start planning and planting. I'll update with photos of my lovely growing garden shortly, it is doing very well.

My Bathroom Renovation, part 2

After the bathroom was practically gutted, it was time to start putting it back together. Having the floor completely ripped up at least meant it was somewhat easier for the plumber to get to the pipes and sort out the plumbing, some of which was looking a bit dodgy - again, such a wonderful DIY job was done on this bathroom previously...

The bath and frame are positioned.

Bob the builder looking busy building the new laundry cupboard.

Bath in place, it is starting to take shape!

I have walls again!

The shell of the cupboard has been built - slightly smaller than the original so that I could accommodate a bath. The bath is also slightly smaller than standard so that I could still have a laundry cupboard, as there is nowhere else in the house to put a washing machine.

My shiny new vanity - now I have real storage, this will be much better than the plastic drawer set from the Warehouse I've had under the sink for ages.

The bath liner is fitted.

It took me a while to decide on paint colours - I wanted something I liked and that matched the wood detailing, but not something too modern as it isn't in-keeping with the house. In the end I chose a deep purple with an off-white purple for the upper walls. People who know me know how much I like purple, but honestly it was what matched best! (And it was actually my boyfriend who originally picked it).


New floor! It's just vinyl but the wood effect works well in the bathroom and blends well with the real wooden floors I have in the hallway - so much so that when my mum first saw it she thought it was wood.

Really taking shape, not long until it's finished!

The shower is in! Finally I have a shower with good pressure!

Cupboard doors looking very smart.

All finished!

I've had the bathroom finished for a couple of months now, and am still loving it. The shower is so much better and it's nice to have a bath once in a while too, and the whole bathroom feels a lot cleaner and tidier than before, with plenty of storage. It'll be a while before I can afford any more house renovations, so in the meantime it's on to the garden!

Tuesday, September 7, 2010

Where oh where shall my garden go?

After building my garden boxes, it was time to position them. I'd chosen to put my garden along the side of the house as this side gets the most sun, even managing a good morning of sunshine in the darkest winter months, at least until the next door neighbour's trees obscure it. The sun is almost at the point of topping those trees now (beginning of spring) so it should be fine in the summer time. The bottom of the garden is the flattest part, with a slope up to another fairly flat level. For some reason, I decided to place my boxes in a diamond rather than square pattern... not sure why really but it seemed to make sense at the time! I think it makes the garden look interesting anyway, although it is perhaps not an efficient use of space...

I had a bit of help from my flatmate to remove some of the grass from the area I had marked out, although I went around afterwards and straightened it up a bit as his edges weren't that straight.


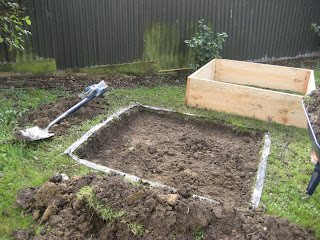
My lovely cut out square of ground.

I placed weed matting on the ground to stop any weeds from getting into my beds. I don't think that will be too much of a problem, the grass is dying just with me trampling all over it. The box fits over the top and nestles into the cut out square so it won't move too much.

The first two boxes fit snugly in the flattest bit of the garden.

Now came the dilemma of where to put the next box. The further up the garden, the less sunny it is, so I really wanted to keep it close to the first two. Unfortunately there is a bit of a slope in the way.

I decided that the slope wouldn't stop me, I could just dig the bed down into it. Easier said than done, it took me a lot of digging over an afternoon and following morning to get the bed vaguely level. It rained overnight as well, so I was slipping around in the mud a lot, but I think it helped to loosen the heavy clay soil somewhat.

I marked out the area with black tape and then started to dig.

Poppy lends a hand - put your back into it!

Almost finished.

The box goes into place.

This was incredibly hard to do on my own but I got there eventually after quite a bit of heavy work! It is still not quite level but was the best I could get it and I think it will be fine.

The three 4x4ft boxes finally in position.

I've protected them with bird netting, not because of birds but to stop the multitude of cats in my neighbourhood from using them as litter trays. Of course my cat is much better behaved! The grass and soil went behind the fence by the garage to raise that area a bit as I am going to make a pathway around to the side of the garage to make a composting area... don't think the neighbours will mind will they??

All the boxes in place and partially filled with compost. In the back is my 2x4 box which I have placed in an empty space in my old garden bed between two plants I uncovered from the mass of weeds that was originally there. I'll make sure to keep those bushes trimmed and away from my box. It will be planted with raspberry canes - if they fruit higher than the fence I can also go around the fence and pick them.

It was a lot of work to cut into the slope - but I will probably do it again for another 4x4 box at a later date. Either than or cut the whole slope out completely and put in a retaining wall. Tempting, but an awful lot of digging for me...

I also treated the wood with linseed oil to prolong the life of boxes. I will do another coat soon. If only it would stop raining!

Next - filling and planting the boxes!

My Bathroom Renovation, part 1

One of the things I've been itching to get done since I moved into my new house is the bathroom. It was functional (barely) but had a lot of issues, not least the terrible shower water pressure and the fact the shower base was leaking. To get a hot shower you had to turn the shower mixer right around as far as it would go, and then you would get scorching hot water dribbling out. Any less than that and you would just get a cold shower. Not pleasant. I was also fairly convinced the shower had been leaking and rotting the floor away - there was a suspicious sponginess to the floor by the corner of the shower.

It took a long while to find good builders who actually bothered to give me a quote (clearly builders in Dunedin have too much work, as I got a complete lack of response from many of them). The builders I chose were recommended to me on WOMF, which is a useful site for finding recommendations. I'll talk about the builders more when I inspect the finished work!

I chose a new vanity to replace the pedestal sink, and a bath and bath screen with a slide shower to replace the tiny corner shower. I also have a laundry cupboard in the bathroom which accommodates the washing machine. It is actually too big for the purpose, and needed to be made slightly smaller so that the bath could comfortably fit. Even so I do have a slightly shorter than standard bath, but it is still a decent size. The items I chose weren't particularly expensive, but are practical options. The most expensive items were the taps and mixers - I needed good quality tap ware that would function with my unequal low pressure water system. I chose some nice taps from the Methven catalogue, a company well known in NZ for their specialised low pressure tap ware.

On Monday morning the builders and the plumber arrived and started to demolish the existing bathroom. Out came the sink and washing machine, followed by the demolition of the cupboard and shower

When we were able to see the flooring it was obvious that there was extensive water damage and the whole floor would need replacing.

Not only was their water damage from the shower but also from the washing machine. When I first moved in the hot water tap had been leaking, probably for a long time. It was clear the bathroom had been a bit of a DIY job - the floor was just particle board with the vinyl put straight on top, and at one end was a gap where the floor did not even reach the wall! So the floor was removed as well. The builder described it like pulling up weetabix, the damage was that bad. I think the vinyl was the only thing stopping us from falling through!

Luckily the joints underneath the house are in fairly good condition considering the age of the house. We did, however, spend Monday night without a bathroom floor! I'm glad that the toilet is in a separate room! The cat, who likes to explore under the house, was having great fun jumping up onto the joists. Unfortunately she kept disappearing when I tried to take a photo.

I had a slight dilemma about which spout to use on the bathroom vanity as I could not decide from the pictures in the catalogue. The lovely plumber went and got me some spouts to see to help me choose. I posted the photos on Facebook to see what people thought.


I opted for the high-rise spout in the end, it got the most votes! I hadn't been keen on it in the catalogue but seeing it in real life helped a lot.

The building work continues on Tuesday, with the new floor, plumbing and bath being fitted. Excited!

Tuesday, August 24, 2010

Fun at the Farmers Market!

Every Saturday morning, the car park next to Dunedin Railway Station buzzes with people. It's time for the Otago Farmers Market, a year round, weekly market where vendors from all over Otago come to sell their produce.

I like to go to the Farmers Market whenever I have a Saturday morning off work, except for perhaps when it is bucketing down with rain. Sometimes it's just a quick visit to buy a few veggies, or to meet up with a friend and get a coffee and a yummy crepe from the French man at La Crepe.

In a bid to be a bit healthier and buy more local produce, I decided last Saturday I would try and buy most of my groceries for the week/fortnight. I budgeted myself $60 for the food. Normally I would go to the supermarket for a 'big shop' about once a fortnight and I would always be shocked at the amount of money I spent compared to what I had bought.

I went to the market fairly early in the morning - about 9am - when the selection is better. It usually runs from 8am until 12ish - although there isn't much left by then!

Here's what I bought:

Some of this will last me longer than a week, which is probably a good thing as I'm working night shifts next weekend, so might not quite be up for visiting the market after work!

The big plus of buying local produce is that you are buying in season. I bought carrots and parsnips, spinach (I love spinach and I definitely need the iron!), broccoli, 2kg of potatoes, and yummy Braeburn and Granny Smith apples. I rarely used to eat apples but have developed a taste for them again. I also bought a loaf of multi grain bread and a loaf of sour dough bread and half a dozen free range eggs. I bought 2 large chicken breasts for $8, which will easily last me for four meals, and some yummy bacon from Happy Hogs. That's a bit of a guilty pleasure, I love bacon!

Then I looked in my wallet and realised I still had plenty of money left, so on a whim I bought some hummus and a pot of mixed seeds to sprinkle on cereal etc. And I still hadn't broken the budget! It was time for a celebratory crepe!

I was pretty pleased with my purchases, the bread will only last a few days but the rest will easily last me a week or two. I haven't done a price comparison with the supermarket, but some things definitely seemed cheaper, and then there is the added bonus of not buying snacks and packaged food I don't really need. There are plenty of other things on offer at the Farmers Market too, from fish and venison to jam, beer, cheese and even plants and seedlings. Last year I bought my cherry tomato plants from the Farmers Market and they produced very well for me all summer.

And yes, after the shopping it was time for hummus on sour dough for lunch!

Wednesday, August 18, 2010

Building a New Garden

One of my goals since being in my new house is to have a proper vegetable garden. Last year I grew quite a bit in containers, but this year I wanted to expand and make use of the space I had. After all, who needs all that grass to mow??

Last year I found a very interesting book in the library called Square Foot Gardening, by Mel Bartholomew. Unfortunately it always seems like it was booked out of the library when I wanted it again, so in the end I bought my own copy. I really liked some of the ideas in the book and decided that this year as an experiment I would follow Mel's method.

The main concept of the book is to garden in squares rather than traditional row gardening. Raised beds are used, and separated into square foot sections. NZ is a metric country, but I tend to work in both imperial and metric as I'm from the UK and I was taught both at school. Different numbers of plants can be grown in each square - for example you might grow one tomato plant in one square, but can grow 16 carrots in the same amount of space. The idea is that you plant what you need, when you need. Gone are the summers of my childhood when my dad's courgettes would all be ready at once and we would have a massive pile of them on the table to get through. Anyone wonder why I hate courgettes? That's why!

Mel's book had been around for several decades, but it was recently updated to include mixing up your growing media from scratch rather than improving your existing soil. This is great as my soil is pretty much all clay and I don't fancy my chances of growing much in it without some hard work! The bonus of starting from scratch is that you should be lessening the chance of weeds growing - and if they do get in there they are easy to spot and remove. I'll discuss the growing media in a separate post.

I decided that my raised beds would be best in the garden on the north side of my house, which gets all morning sun, and will get more afternoon soon in a few more weeks when the sun tops the neighbour's cabbage trees.

I had a few different ideas about the size of the raised beds I was going to make. Unfortunately as I only have my little car and no tow bar, I needed to get lengths of wood that would fit in the back of the car. Luckily the lovely guys at Placemakers cut up all my wood to the sizes I wanted, making it a lot easier for me! I originally intended to make 4 boxes, each 4x4ft. Later I decided on 3 this size, and one 2x4ft box, which meant I had to cut one piece of wood in half (well, luckily my flatmate did that for me!) However, I did all the box making by myself.

Beginnings of the box, a 4ft (120cm) long piece of timber, which will sit 30cms high. You can also see my electric drill/screwdriver, measure and other tools, along with my tulips and garlic that are growing in pots by the house.

To begin with I had to drill holes along one edge of each piece of wood for the screws.

Then it was a case of screwing each side together, I rotated all the corners so the box is equal length on all sides.

The finished box. I put extra pieces of wood in each corner to help stabilise the box. It is pretty heavy and it was quite hard work moving it when I was on my own, although my flatmate did help out a bit with moving the boxes to their place in the garden. I should note that the timber I used is untreated, as I wasn't keen on using chemically treated wood that might leech nasties into my vegetables. Later on I painted the outside of the box with linseed oil which is a good sealant. The boxes will probably rot in a few years, but the wood is fairly cheap and I don't mind having to replace them later on as I might have developed some new ideas by then!

I also made a 2x4ft box. In future I think I will stick to the 2x4 size as it was a lot easier for me to move around by myself. I have space in my garden for plenty more boxes, but I will see how I go with these ones first.