After building my garden boxes, it was time to position them. I'd chosen to put my garden along the side of the house as this side gets the most sun, even managing a good morning of sunshine in the darkest winter months, at least until the next door neighbour's trees obscure it. The sun is almost at the point of topping those trees now (beginning of spring) so it should be fine in the summer time. The bottom of the garden is the flattest part, with a slope up to another fairly flat level. For some reason, I decided to place my boxes in a diamond rather than square pattern... not sure why really but it seemed to make sense at the time! I think it makes the garden look interesting anyway, although it is perhaps not an efficient use of space...
I had a bit of help from my flatmate to remove some of the grass from the area I had marked out, although I went around afterwards and straightened it up a bit as his edges weren't that straight.
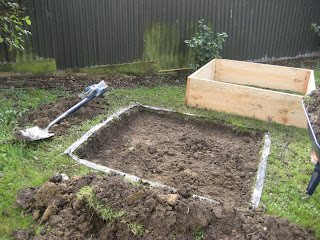
My lovely cut out square of ground.
I placed weed matting on the ground to stop any weeds from getting into my beds. I don't think that will be too much of a problem, the grass is dying just with me trampling all over it. The box fits over the top and nestles into the cut out square so it won't move too much.
The first two boxes fit snugly in the flattest bit of the garden.
Now came the dilemma of where to put the next box. The further up the garden, the less sunny it is, so I really wanted to keep it close to the first two. Unfortunately there is a bit of a slope in the way.
I decided that the slope wouldn't stop me, I could just dig the bed down into it. Easier said than done, it took me a lot of digging over an afternoon and following morning to get the bed vaguely level. It rained overnight as well, so I was slipping around in the mud a lot, but I think it helped to loosen the heavy clay soil somewhat.
I marked out the area with black tape and then started to dig.
Poppy lends a hand - put your back into it!
Almost finished.
The box goes into place.
This was incredibly hard to do on my own but I got there eventually after quite a bit of heavy work! It is still not quite level but was the best I could get it and I think it will be fine.
The three 4x4ft boxes finally in position.
I've protected them with bird netting, not because of birds but to stop the multitude of cats in my neighbourhood from using them as litter trays. Of course my cat is much better behaved! The grass and soil went behind the fence by the garage to raise that area a bit as I am going to make a pathway around to the side of the garage to make a composting area... don't think the neighbours will mind will they??
All the boxes in place and partially filled with compost. In the back is my 2x4 box which I have placed in an empty space in my old garden bed between two plants I uncovered from the mass of weeds that was originally there. I'll make sure to keep those bushes trimmed and away from my box. It will be planted with raspberry canes - if they fruit higher than the fence I can also go around the fence and pick them.
It was a lot of work to cut into the slope - but I will probably do it again for another 4x4 box at a later date. Either than or cut the whole slope out completely and put in a retaining wall. Tempting, but an awful lot of digging for me...
I also treated the wood with linseed oil to prolong the life of boxes. I will do another coat soon. If only it would stop raining!
Next - filling and planting the boxes!


2 comments:
Great work! The diamond shape looks really lovely, actually. I don't know whether its more efficient or not, but it certainly looks nicer.
I've just built two garden beds and just did it the lazy way, with old bricks and spent soil, topping it up with manure. You've reminded me to blog about it now.
Looks like a lot of hard work!
Post a Comment